Guiness World record endurance drone build
Giant quad that flies 3:12hrs
transcript
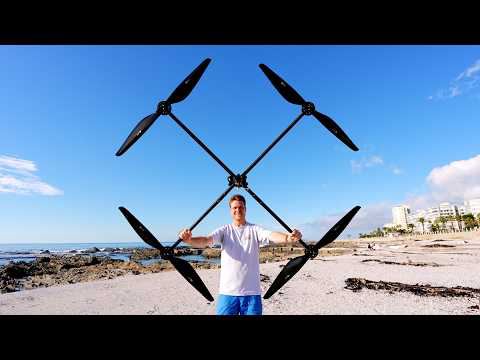
That right there is what I hope to be the most efficient drone multirotor ever made. Ever since I started building drones, I've always had the dream of building a drone that can fly for as long as physically possible. Currently, the record belongs to Sci-Fily with their drone, the Q12. This awesome piece of engineering can fly for 3 hours and 12 minutes [music] on one charge, and it's going to be my benchmark of what I need to beat. This is going to be one of the toughest engineering challenges I have ever undertaken. So, let's see what I can do. Starting with two of the most important parts. The motors and the propellers have arrived. And in case you can't tell, this box is massive. And there is a very good reason for that. Look at this box. This is for the propellers. These things are huge. That is just like [music] incredibly shaped [snorts] carbon fiber. Look at that beauty. And of course, we also have the motors in here. These are the antique. Wow, these things are massive. Look at that. So, it's actually the same model technically as the ones for my solar drone, but these [music] are way bigger obviously and way more powerful and more efficient. [music] That's the key part there. This is a propeller for my solar power drone, which were already big. And this is a propeller for the world record endurance drone. I can't even get in frame. It's so huge. And this is also really funny. If you look here, these are the propellers for the world's fastest drone. And that size difference is actually just comical. I mean, look at that. because I know people are going to ask. The propellers are the G40 props by T-mo. And the motors are the anti-gravity series, also from T- Motor. And this one is the MN105 V2. And these are 90 KV. Typically, the bigger the propeller, the more efficient it is. And that's because they're able to generate a lot of thrust while spinning at a really low RPM. >> [music] >> So, I chose the biggest propeller I could find, which is this 40-in one from T- Motor. Now, to choose a motor to go with this propeller, I went with the smallest and lightest motor I could find that still had enough torque to spin this prop at the RPMs I need, which happened to be this one. Because this is such an unusual use case, there's actually no data online of how efficient this propeller is with this motor at the rarely low RPMs I want it to spin at. So, I'm going to set up a bench testing rig now where I can see exactly how efficient this propeller is. And from that, we can calculate exactly what battery we need. I'm using the Hograve Nano Drive 4 in-1 ESC. And the reason for that is because I've used Hograve ESC's before, and they are incredibly reliable and efficient. So, it's kind of the perfect ESC for this project. This is the super simple thrust testing setup. And we basically just got the motor and propeller mounted on here. And this is going to spin and it's obviously going to generate some thrust [music] which is going to push down on the scale and give us a reading on the screen there. And then on the bottom here, we've got a power meter connected. So we'll be able to see exactly how much power is required to generate x amount of thrust. From my testing, I was able to generate this really interesting graph. On the x-axis, we have the thrust in grams, and on the y-axis, we have the efficiency in grams of thrust per watt. As you would expect, when your thrust goes up, your efficiency goes down. So, we ready to make sure the drone isn't too heavy. From there, I was able to plot the estimated flight time depending on the battery size I'm using. And from this, I found that a battery between 4,000 and 5,000 g was the optimal weight. Next, I hopped into On Shape, who's sponsoring this video, to draw up a rough model of the drone so that I can run it through CFD. And I want to test different arm lengths for the drone to find out exactly what arm length is going to give me the most efficient design. A very cool feature I found in On Shape is the variable studio. And when you set your dimensions in [music] on Shape to names, then you can change the value in the variable studio, and that'll automatically adjust all your dimensions in the model. [music] This makes it super easy to adjust something like the length of the arms and export all these different models for CFD testing. I then ran simulations in Air Shaper for all five different arm length configurations and I analyzed the flow patterns and also the interactions between the wakes of each of the propellers. And more importantly, I looked at the efficiency of each of the propellers and I actually determined that the arm length of 800 mm turned out to be the sweet spot where we got maximum efficiency. Unfortunately, my carbon fiber tubes are only 1 m long, so I had to cut them and join them at the ends to get them to the full length for the drone. I finished with that. So, we've got two 1.6 m long tubes, and you can see where I've joined it there in the middle. And that means it's now time to make the motor mounts for the ends of the arms. I decided to go for a really simple design where I essentially have two halves which clamp together and the motor mounts directly to the top half. This is the version one of the motor mounts and [music] it's definitely incredibly solid. I'm very confident this would work on the drone. However, when I was looking at it, it did look a bit overengineered and a bit too heavy. Now, because it's a motor mount, any weight changes I make on this are multiplied four times because we have four motors. So, I redesigned it a bit and came up with this smaller design [music] which has smaller dimensions overall. It's a bit shorter. It only uses four bolts. And because of that, it's actually a lot lighter. And in any normal circumstance, I would go for the beefier, stronger one. However, this project is all about efficiency. So, this is the one that we're going to try out first, and hopefully it holds up. Just like with the motor mounts, my version two of my central hub is actually quite a bit smaller and lighter than version one. So, as you can see here, the version one on the left is quite a bit larger and taller than the version two. And it's also got a separate battery plate, whereas this one has an integrated battery plate, so that'll save more weight [music] on screws and bolts. And this design is actually 40 g lighter than the original. So, I really hope it's strong enough because [music] every bit of weight we can shave off will give us a bit more flight time. I did also run an FEA simulation in On Shape, and all seem to be fine. We've got all the parts 3D printed and ready, so it's finally time to put everything together. It is [music] looking huge. But overall, I am very happy with it. I think it should work really well. It feels nice. It's strong. So, now it's on to the electronics. Because the arms of this drone are so long, I need to consider the motor wire thickness very carefully. There's going to be about 11 m or 36 ft of motor wire. So, it can make a big difference. And there's two major things you need to consider for this. Number one is the weight of the wire. Obviously, the thicker the wire, the heavier it's going to be and the more power the drone is going to use to actually keep that wire in the air. Now, number two that you need to consider is the copper losses along the wire. The thicker the wire, the less heat you actually lose in power across the wire. And how I'm going to test that is I've cut a meter of each wire thickness and I'm going to run it through the power supply and I'm going to measure the voltage drop across each meter of wire. And from that I'll be able to calculate exactly how much power is lost per meter of wire. This graph shows the crazy amount of power you lose as you go for a thinner and thinner wire. And this graph shows how much power you lose just to carry the weight of the extra thicker wire. So it's a really fine balance here. After adding the two graphs together, I was able to plot this really satisfying graph, which shows that 18 AWG is the perfect wire thickness for this drone with the minimal power losses. Then it was time to solder up all the motor wires and run them through the carbon fiber tubes. All the motor wires are connected and they come out in the center here. So, it's time to put all the electronics on these four bolts here and then solder it all up. This drone is the first time I'm using the TBS Lucid H7 flight controller, and I think I'm going to use it for all my drones going forward. It's just so powerful and reliable. I am very impressed with it. I have finished wiring up all the motors to the ESC. So, now I just need to finish the rest of the electronics and also the GPS compass. I'm busy designing the TPU mount to hold the GPS on this little carbon fiber standoff. I made and I must say one of the things I really like about On Shape is when you're designing like this on laptop battery power because it's browser based it'll only drain your laptop battery as if you're just browsing the web which is way slower than if you're running a CPU inensive CAD software. That actually looks perfect. It's amazing when your first design works so well. I also decided to quickly design a small camera holder to mount just in front of the [music] other electronics. I finished the print on my form 4 and I've done it in the silicone 40A resin. So, I'm hoping that that ends up being really soft to mount the camera and absorb the vibrations. It's so nice and squishy. I really hope this works, but there are a lot of vibrations on the drone, so it definitely might not. It is finished and ready for flying. So, going to take it out to the field. Hopefully get some tuning flights in. At the moment, we're actually just using these iFly batteries just cuz I want to save the proper batteries for when we actually have it tuned and ready to go cuz I don't want to damage them. Yeah, hopefully we can get some decent flights in today. Look at it now. I think I probably should have put in some landing gear on the forearms, but I think we'll just have to try it as it is. Tuning these drones is always really difficult and this one started out on a really bad tune. You can see it got into some really uncontrolled oscillations here. I updated the tune to try again and it did not go too well. But I guess this is kind of just part of the drone process. Sometimes things work and sometimes they just don't. Well, it's never great to crash a drone. The good news is that everything seems to have survived remarkably well. The motor mounts are all intact and the central hub is also fine. None of the carbon fiber damaged. We did get a bit of damage on the tip of one of the propellers, but I think that's probably repable with some epoxy and just polishing. So, all in all, it's a pretty good result. However, I did realize that I definitely need some sort of leg or standoff to protect the propellers from digging into the ground. So, I'm going to design and 3D print that. Now, I've got my super simple legs 3D printed. So, now it's time to put these on. And that actually looks pretty good. I think these should work well. My batteries for this drone have finally arrived. And these are actually a big reason why this drone is going to be able to fly for so long. They are the NMC lipos from Tattoo. And what's special about these is they're actually a semi-olid state battery, which means they have a ridiculous capacity to weight ratio. So if we compare it to something like this, which is a more traditional lipo, this has a W per kg rating of about 160 with all the packaging, whereas this is about 320. So this can carry twice as much capacity for the same weight. Now, the downside of that is that it won't be able to deliver as much instantaneous current, but for this project, we don't need that. So, this is the perfect battery. While this battery does look really nice, it does seem like there is quite a lot of protection and packaging around it. And of course, this project is all about getting everything as light as possible. So, while this isn't recommended, I'm going to tear it down a bit and see how much weight I can remove. Okay, so this is the before and this is the after. And as you can see, I've managed to remove a ton of packaging. And I've also changed out the connector from this big XT90 to an XT60 just cuz we don't need such a big one. And in total, I was able to remove about 180 g of packaging just from one battery. So if you times that by two, that's 360 g. And that's about as much weight as the entire carbon fiber frame. So, that's going to make a big difference. Now, I do realize this is a little bit ridiculously exposed and unsafe. So, I'm going to have to add some back. But overall, we've saved a lot of weight. Drone is ready for testing again, but this time we've got the landing gear installed to protect the propellers, and we're also using the proper batteries. So this is about a little heavier than the final weight will be. So it'll give a really good indication of the efficiency we have. This time I scrapped the old tune completely and switched to the same tune that I used for my solo drone which actually worked out remarkably well. Very nice. Oh, that was good. That tuning session actually went really well and I think the drone is ready from a tuning perspective for the world record flight, but there are quite a few other changes that I need to make before then. So, first of all, the O4 Airun light didn't even work at all. I don't know what was wrong with it, but it means we didn't even get an OSD. So, I am going to switch to the standard O4 Air unit, which is unfortunately heavier and more power hungry, but I think it is necessary. Then same thing with the GPS. The small and light one actually didn't work very well. I'm not very impressed with it. So, we're going to switch to the Matec tried and tested GPS. Then the legs, all four of them broke on the ends there. So, I'm going to have to redesign them and reinforce them and install new ones obviously. But then lastly, the most important thing, as you can see here, these two motors actually twisted off axis mid-flight, and they're pretty loose, as you can see. And the reason that happened is because they are spinning on this axis here where I've joined the two arms together, which is obviously really bad. So, what I'm going to do to fix that is actually drill a hole here and here, and then I'm going to put bolts through, and that way there will be no ways they can spin off axis. the new supports for the bigger 04 air unit camera. I done printing on the form 4 and they actually look really good. Even though I printed them with absolutely no support with that overhang, they still came out perfectly, which is amazing. The drone is all updated and ready to go. So, we've got these bolts through the arms here, and that's going to stop the motors from rotating. Then, we've got the updated legs installed, and we've also got the updated air unit and GPS installed. The goal for this session was to get the position hold working perfectly because obviously if the drone's flying for over 3 hours, I don't want to be flying it the whole time. Unfortunately, it had a little accident with my laptop. Wow. Didn't break it, but [laughter] guess like it's not ideal. After a bit more trial and error with INAV, I did eventually get the drone holding position pretty perfectly, which means it was ready for the world record run. The day has finally come to see exactly how long this drone can fly for. And the weather's looking pretty good. So, that's great. But I am also really nervous to be honest. I just have no idea exactly how long it's going to fly for. I've never even drained these batteries all the way down. So, there is quite a large range we could get, but I'm hoping for the best. And there's only one way to find out how long it can fly for. The drone is up. It's been flying for about 10 minutes now. You can probably see it there behind me. And all is going well. It's a little bit gustier than I would have liked, but I think we'll be okay. It's holding position beautifully, as you can see there. And the controller is just on the ground. So I'm not doing anything and it is holding perfectly. So that is great. We're at the 1 hour and 24 minute mark. The drone is still hovering nice and strong in the sky. Unfortunately, [music] the wind has died down a bit. And this might sound counterintuitive, but the drone's actually more efficient if there is a bit of wind blowing into it. So, the hover power has gone up a bit. We are at the two hours and 14 minute mark, which is amazing because the Sci-Fi drone could only hover for two hours. So, we are way ahead of that because we have 33% battery at least remaining. [music] So, we're looking good. And I just wanted to mention, you're probably wondering why we don't have any witnesses here for an official Guinness World Record attempt. [music] And that's just because I've never flown this drone for long before. I don't know if it's actually going to do it. And asking people to come out for potentially 4 hours is a lot. So, I will do that in the future. And we'll do that with a forward flight. So, we'll get a much higher flight time. But for now, while the drone is still temperamental or unknown, at least, I didn't want to have any witnesses here. It was at this point that I got quite nervous that the drone wasn't actually going to make it. So, I experimented with some forward flight to reduce the [music] power consumption. And I did that for about 5 minutes. The power consumption drop was crazy. Going from about 400 watts in hover [music] to as low as 250 watts in slow forward flight. That makes me very excited for the forward flight world record attempt because the drone will fly for at least [music] an hour longer. The drone is about to pass Sci-Fily's official record right now and it's done it. So, we are officially at 3 hours 12 minutes of flight time. And as you can see, it's still hovering very nicely. We're waiting to see exactly how long the drone's going to fly for. I just wanted to mention that if you want to try out On [music] Shape for free, which is the CAD software I use to design every part in that drone, then you can do so by scanning the QR code or going to the link in the description. So, we're just below 3 volts per battery cell now and we need to land on 2.95. So, I'm going to bring it down. But I think we are going to cross 3 hours and 30 minutes. So, that is really exciting and a very good result. But I don't want to damage these batteries. So, I do need to bring it down very soon. Fortunately, this project turned out to be a massive success because the drone managed to fly for 3 hours 31 [music] minutes and 6 seconds, which is a new unofficial world record. But this is just the beginning. Make sure you're subscribed [music] to see when I program autonomous forward flight to get a way longer flight time and really push this thing to its limits.
- from
- Flying FPV
- added
- 2026-10-10
- likes
- 0
Flying FPV › Complete Systems 🎁: “Giant quad that flies 3:12hrs”