3D Printed Drone Build - How to Wire OpenHD and Ultrasonic Abstacle Avoidance
ultrasonic obstacle avoidance for quadcopter and OpenHD teamplay.
transcript
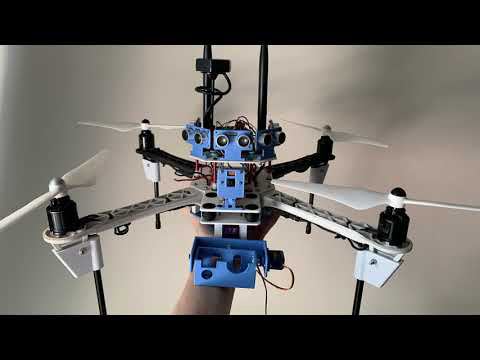
hello guys this is my drone building series part two in this video i will show you my progress on this room how i set up opengd and how i set up five directional obstacle avoidance let me disassemble it first [Music] as you can see i mounted pixhawk gps arduino nano two antennas and five ultrasonic sensors on the top plate and there are six stands to support it [Music] unplug the esc wires and the wires that connects to raspberry pi zero [Music] [Music] next let me disassemble the raspberry pi 0 which is the air pi in the openhd system i choose the 0 2w because it is quite powerful but it needs additional configuration when flashing sd card it is explained in openhd website by the way i'm using openhd version 2.0.8 you can see i use a lot of lionel stands and nuts to reduce the weight i bought this wi-fi adapter from taobao i think it's also available on aliexpress the four pins from left to right are vcc d minus t plus and ground [Music] i connect them accordingly to the raspberry pi don't worry at the end of the video i will give you the wiring diagram so that you won't go wrong airplane is connected to the pixhawk telemetry part one later i will show you how to configure the mission planner this is how my air pipe is mounted on the drone [Music] this is raspberry pi 3b i use it as ground pipe i designed a small model to mount wi-fi adapter the wiring is pretty much the same but be careful don't connect to the round pins from top to down is ground d plus and d minus and also five volt now let's power up the raspberry pi attention please always install the tennis before you power on your wi-fi adapter the booting up process is quite fast i use iphone to connect to open hd wifi and open view openhd app if successful you will see video screen right away if not do check the os you flash on your sd card and most important the wiring you can drag around the indicator and do whatever configuration as you want [Music] you should see the logs from both air pi and ground pi [Music] as you can see the latency is small but sometimes you can see some lagging but it's fine for me [Music] you can also shutting down the air pipe and ground pipe from the app after shutting down the activity in light will be turned off let's talk about ultrasonic sensors [Music] it is not easy for ultrasonic sensor to directly communicate with pixmark but i can use the arduino nano as a messenger between them [Music] i connect the trigger pin and echo pin together so that only one wire is used i also connect all five volt wires and all ground wires together and hide them under the pixel the arduino is connected to peak stock telemetry part 2. now let's connect the arduino to the computer open arduino ide this is code to upload the code will be linked in the description the first few lines are the libraries that we need to use [Music] different numbers represent different direction in the proximity in my case i used forward forward right forward left and left here you need to define which digital pin the ultrasonic sensor connects to for example left sensor connects to pinion 6. [Music] normally the system id of your px will be 1 unless you have changed it before [Music] the serial communication pin will be tx is 10 and rx is 11. in the setup we start the communication with pixhawk and start up serial monitor and this function is to send heartbeat to the pixel and this function is to send distance data to pix [Music] in the loop the arduino will read ultrasonic sensor data afterwards the data will be sent to pix continuously that's all for the code now you need to upload this code to your arduino nano after that open serial monitor you can see the distance reading from the ultrasonic sensor but it seems my forward sensor has some problem the reading sometimes will be zero i will replace that later now let's keep the arduino connected we also connect the pixock to our computer [Music] let's open mission banana [Music] i have already done the basic setup for my peg stock so i will not do it here [Music] after connecting let's go to the full parameter setting firstly let's search for serial port [Music] kilometre 1 is connected to open hd air pipe so we set the port rate to 1152 and set the protocol to map link 2. [Music] telemetry 2 is connected to arduino nano so we set the portrait to 576 and set the particle to mavlink1 [Music] next let's search for proximity [Music] set the proximity type to map link and set the length direction to enabled click right parameter to save your change next reboot your pix and connect your computer again hit your keyboard ctrl f to open the additional window [Music] click on proximity now you can see the proximity ui the red light represents the distance between the object and your ultrasonic sensor if you can see these lines it means you are successful on the proximity setup [Music] now we can count the air pipe to our peak stock so that we can see some telemetry data in our queue openhd app [Music] once again install your antennas before you power up the wifi adapter [Music] the air pi is connected to telemetry port one [Music] now let's power up open hd again now you can see some additional information on the screen when you move your drone you can see the horizontal line is also moving this looks very promising as i mentioned just now i have made a wiring diagram for your reference on the left is a connection of the ground pipe [Music] on the right it's a connection for airplay [Music] for now please ignore the optical flow sensor first after i try it i will show you how i use it the connection of the ultrasonic sensor may not be the same as in my code so please check first before you upload the code okay guys that's basically all about this video if you have any question please feel free to ask in the comments i will try my best to answer them as always please like my video and subscribe to my channel you will see more interesting content see you guys [Music]
- from
- Flying FPV
- added
- 2026-10-10
- likes
- 0
Flying FPV › Sensors 🌡️: “ultrasonic obstacle avoidance for quadcopter and OpenHD teamplay.”